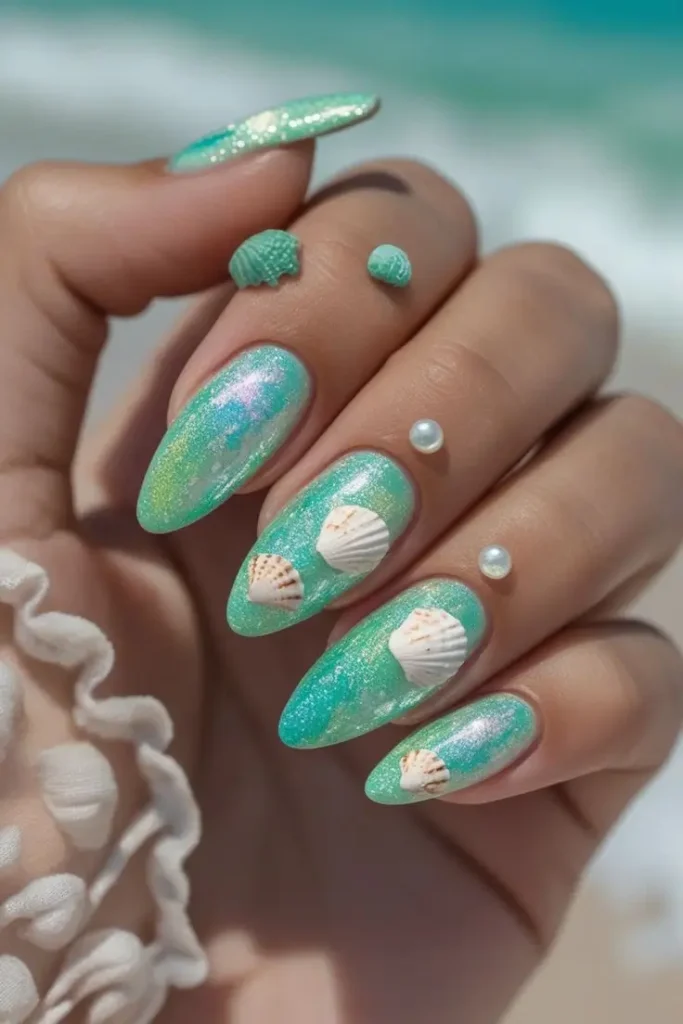
Dive into a whimsical world with “Ocean Shell Pearl Nails.” This mermaid-inspired design features sparkling aqua-green shimmer, delicate seashell embellishments, and subtle pearls. Perfect for a fresh, enchanting, and breezy look!
Nail Art Design
💅 Materials Used
To recreate this whimsical mermaid-inspired look, you’ll generally need:
- Nail Prep: File, buffer, cleanser.
- Base & Top Coats: Essential for protection and shine.
- Colored Polishes: – Amazon
- Iridescent aqua-green or seafoam green nail polish (with a shimmery/chunky glitter finish)
- Sheer opalescent or pearl-effect top coat (optional, for extra shimmer)
- Embellishments: – Amazon
- Small nail art seashells (flat-back are easiest)
- Tiny flat-back nail art pearls
- Nail art glue or strong clear top coat (for attaching embellishments) – Amazon
- Tools:
- Dotting tool or wax picker (for precise placement of embellishments)
- Acetone or nail polish remover & lint-free wipes for clean-up.
📝 Instructions: Crafting Your Mermaid Mani
Achieving this charming design involves a shimmery base and careful placement of 3D elements. These steps are a suggested guide, and actual techniques may vary.
- Prep Nails: Clean and shape nails, apply base coat.
- Apply Shimmer Base:
- Apply two thin coats of your iridescent aqua-green nail polish. Ensure even coverage and let each coat dry thoroughly to maximize shimmer.
- Optional: Add a thin coat of opalescent top coat for extra pearl-like glow.
- Attach Seashells & Pearls:
- Once your base color is fully dry, apply a small dot of nail art glue or a dab of thick clear top coat where you want to place a seashell or pearl.
- Carefully pick up each embellishment with a dotting tool or wax picker and gently press it onto the wet glue/top coat. Hold for a few seconds to secure.
- Repeat for all desired embellishments.
- Seal Embellishments (Carefully):
- Apply a thin layer of top coat around the base of the embellishments, trying not to cover them entirely if they are textured. If using a glossy top coat, a generous amount over the whole nail (including the embellishments) will help secure them. For extra security, you might use a builder gel or a second layer of glue around the edges of larger pieces.
- Cure if using gel products.
- Finish: Clean up any polish around your cuticles. Apply cuticle oil.
Disclaimer: These steps are a suggested guide and may not be exact. Provided for reference only.
🎉 Best For Which Occasion/Event?
This delightful design is perfect for:
- Beach Vacations & Resorts: The ultimate accessory for seaside adventures.
- Summer Parties & Picnics: Adds a fun, lighthearted touch to warm-weather gatherings.
- Casual Outings & Everyday Wear: Brightens any day with its whimsical charm.
- Nautical-Themed Events: Perfectly complements ocean-inspired decor.
- Children’s Parties/Events: Playful and imaginative.
💁♀️ Suited to Which Age Group?
The “Ocean Shell Pearl” design has a broad appeal:
- Teens & Young Adults: Will love the trendy mermaid core aesthetic and playful embellishments.
- Adults: A charming and refreshing choice for those who appreciate whimsical or summery designs. It offers a youthful yet sophisticated vibe.
👗 Look Best With Which Outfit and Color Contrast?
This fresh, aquatic design pairs wonderfully with breezy and light aesthetics:
- Complementary Outfits:
- Beachwear: Swimsuits, cover-ups, linen shorts.
- Pastels: Light blues, mint greens, blush pinks, and yellows.
- Neutrals: White, cream, beige, or light denim for a fresh, clean look.
- Flowy Fabrics: Sundresses, bohemian tops, cotton skirts.
- Ideal Color Contrasts:
- Ocean Tones: Other shades of blue, teal, or turquoise in clothing or accessories.
- Coral & Peach: Offer a lovely warm contrast to the cool aqua.
- Gold/Rose Gold: Delicate metallic jewelry complements the shimmer.
- Avoid: Very dark or overly formal outfits that would clash with the light, whimsical feel.
Let your hands become a piece of the ocean with these beautiful Ocean Shell Pearl Nails!