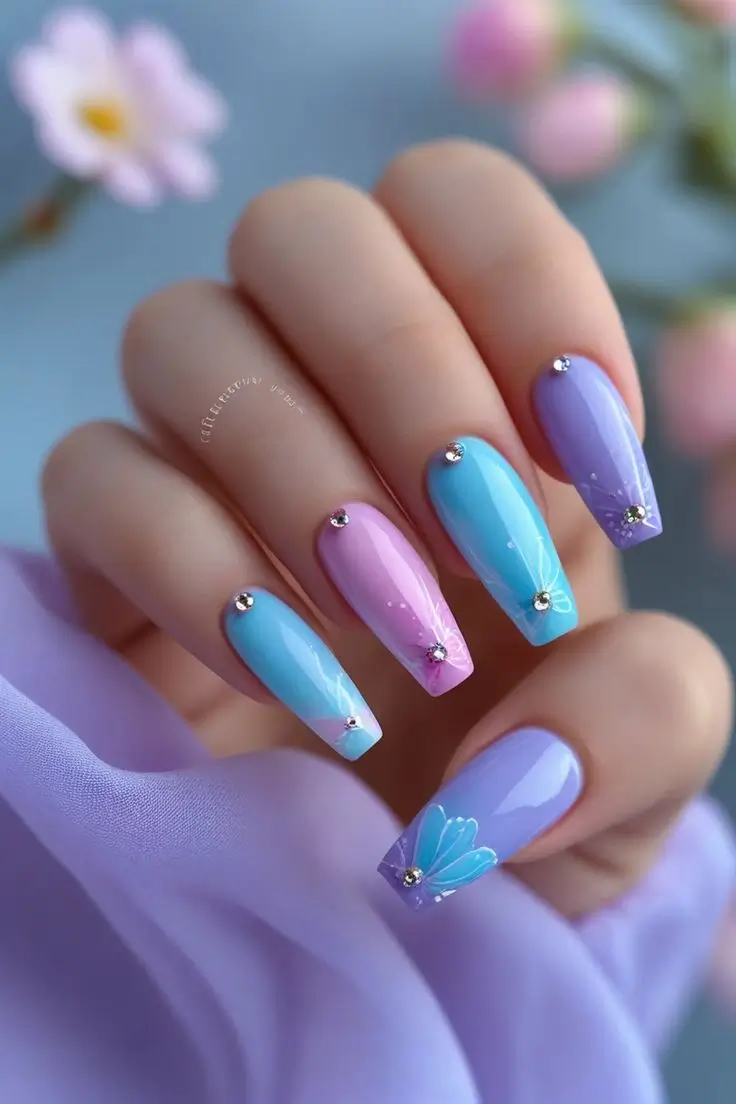
Float into a dream with “Pastel Butterfly Dream Nails!” These lovely coffin-shaped nails feature a soft pastel palette of pink, mint, and lavender, adorned with delicate hand-painted butterfly wings, subtle shimmer, and sparkling rhinestones for a truly whimsical touch.
Nail Art Design
💅 Materials Used
To create this soft and intricate butterfly design, you’ll generally need:
- Nail Prep: File, buffer, cleanser.
- Base & Top Coats: Essential for adhesion and brilliant shine.
- Gel Polishes/Nail Polishes:
- Pastel pink gel polish.
- Pastel mint green gel polish.
- Pastel lavender gel polish.
- White gel polish (for butterfly details).
- Optional: Sheer shimmer polish.
- Embellishments & Tools:
- Fine nail art brush (for butterfly wings).
- Small rhinestones.
- Rhinestone picker tool or wax pencil.
- UV/LED lamp (essential if using gel products).
- Lint-free wipes & gel cleanser.
📝 Instructions: Crafting Your Butterfly Dream Nails
This design involves layering colors and delicate hand-painting, so patience is key.
- Prep Nails: Clean, file, and apply a base coat. Cure if using gel.
- Apply Pastel Bases: Apply 2 thin coats of your chosen pastel colors (pink, mint, lavender) to different nails as desired. For ombre, blend two pastels on one nail. Cure each coat.
- Paint Butterfly Wings: On selected nails, use a fine nail art brush and white polish to carefully hand-paint delicate butterfly wing designs. You can paint half a wing on one side of the nail for a subtle look. Cure.
- Add Rhinestones: While the last color layer is still tacky (or apply a dot of clear gel/nail glue), use a rhinestone picker tool to place small rhinestones near the cuticles or along the butterfly wing designs. Cure if using gel.
- Seal: Apply a glossy top coat over the entire design for shine and protection, ensuring to encapsulate rhinestones if possible for longevity. Cure thoroughly.
- Finish: Cleanse any sticky residue. Apply cuticle oil.
Disclaimer: These steps are a suggested guide and may not be exact. Provided for reference only.
🎉 Best For Which Occasion/Event?
This elegant and magical design is perfect for:
- Spring & Summer: Complements the light and airy feel of the seasons.
- Weddings & Bridal Showers: Adds a delicate and romantic touch.
- Garden Parties & Brunches: Enhances a feminine and whimsical look.
- Special Occasions: Makes a memorable and unique impression.
- Everyday Elegance: For those who love soft, artistic nail art.
💁♀️ Suited to Which Age Group?
The “Pastel Butterfly Dream Nails” design has a universally appealing and graceful charm:
- Teens, Young Adults & Adults: Ideal for individuals who enjoy whimsical, elegant, and artistic nail art.
👗 Look Best With Which Outfit and Color Contrast?
This soft-toned and shimmering design pairs beautifully with light, romantic, and ethereal aesthetics:
- Complementary Outfits:
- Pastel Colors: Pinks, lavenders, mint greens, and light blues.
- White & Neutrals: Allow the delicate design to stand out.
- Flowy Fabrics: Chiffon, silk, lace, and organza.
- Floral Prints: Subtle and complementary floral patterns.
- Romantic or Boho Styles: Dresses, skirts, soft blouses.
- Ideal Color Contrasts:
- Soft & Light: To maintain the dreamy and ethereal aesthetic.
- Silver Accents: To complement the rhinestones and add subtle sparkle.
- Avoid: Very dark, harsh colors or overly busy, geometric patterns that would clash with the delicate, organic feel of the butterflies and flowers.
Let your nails take flight with the beauty of Pastel Butterfly Dream Nails!